Many call the kipping pull up a sloppy strict pull-up with a little gymnastic flair. That framing is wrong and it's how shoulders get blamed for a movement that was never meant to be judged like a strict strength test. The kip is a high-rep efficiency skill, built to cycle bodyweight work with momentum, timing, and torso tension, not to prove who can grind the hardest single rep.
The lab data backs that up. In one biomechanical comparison, kipping pull-ups produced greater hip and knee motion than strict pull-ups, with a maximum hip angle of 48.81 ± 6.80° and average knee angular velocity of 127.23 ± 35.06°/s, while latissimus dorsi activation dropped to 5.86 ± 6.21% and biceps brachii activation to 13.58 ± 5.62% of the strict-pull-up condition (biomechanics comparison). That's not a faster strict rep. That's a different movement with different joint demands and a different training purpose.
What a Kipping Pull Up Is
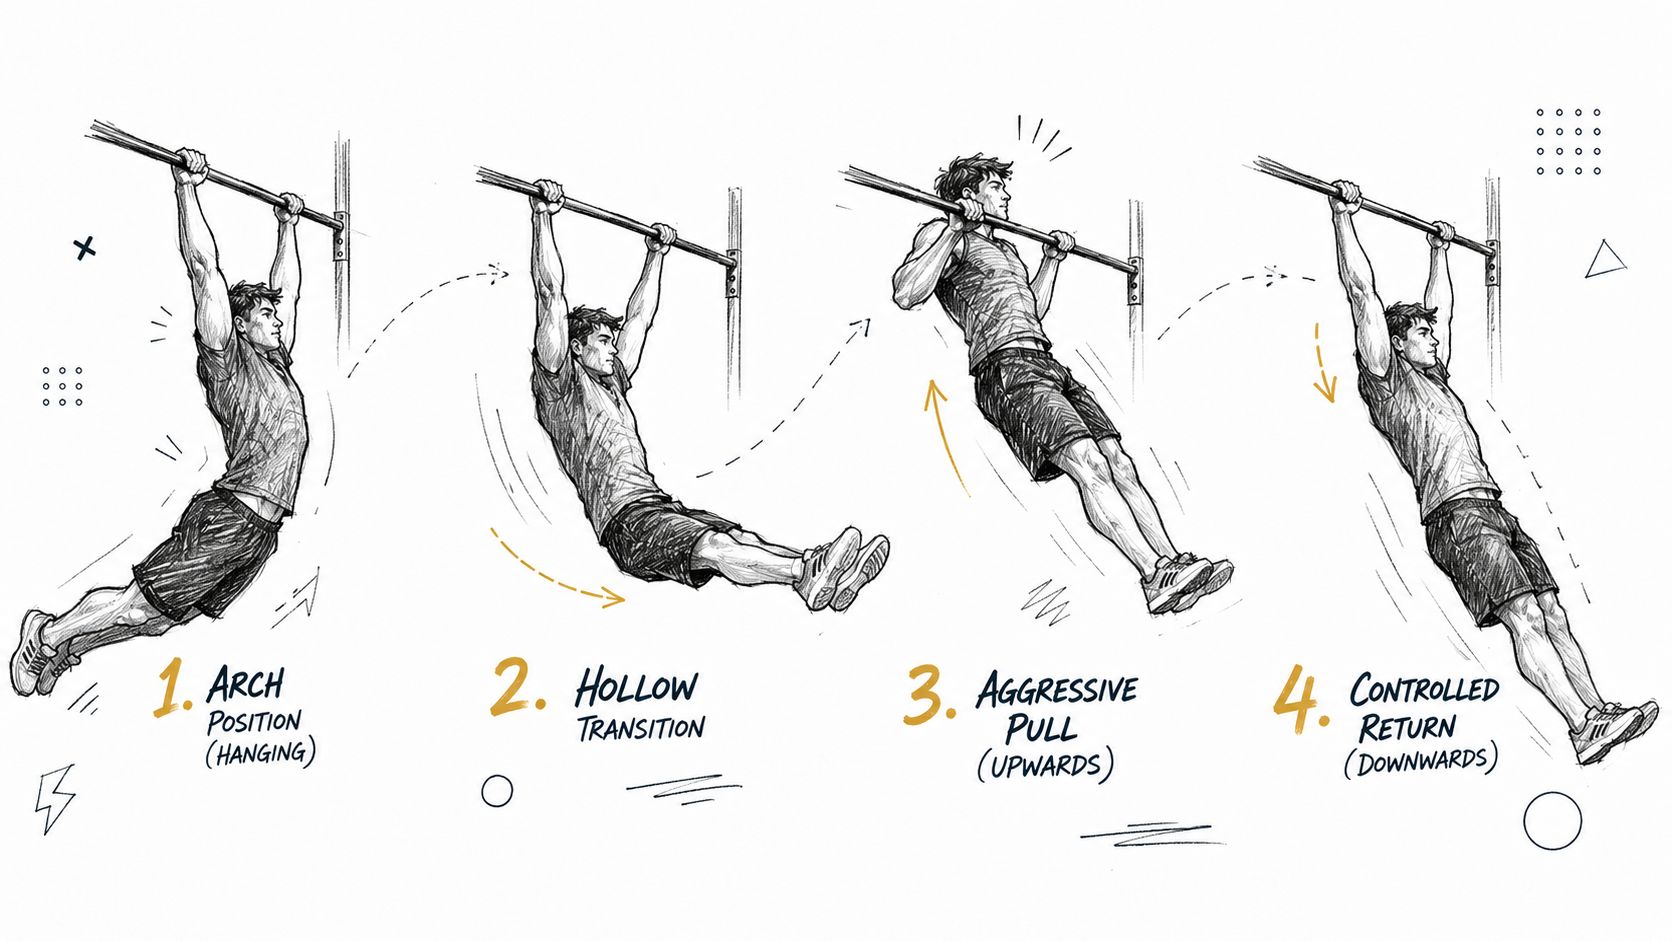
A kipping pull up is a CrossFit-style gymnastic movement that uses a coordinated hip and leg swing to generate momentum. CrossFit teaches it as a linked, repeated skill, not a one-off strength display, and its coaching language breaks the rep into phases like arch, hollow, and aggressive pull (CrossFit's technique guide). That matters because the kip is built around efficient force transfer, not maximal force production.
The right mental model
A kip is a cyclical rebound. The athlete creates shape, stores tension, then transfers that tension into upward motion instead of dead-hanging and muscling every inch of the rep. In practice, that places the movement in the same category as other coached gymnastic skills, where rhythm and position control matter as much as raw strength.
Practical rule: if you only see a kip as “jumping on the bar,” you miss the part that keeps the shoulders safer, the controlled body shape and the timed return.
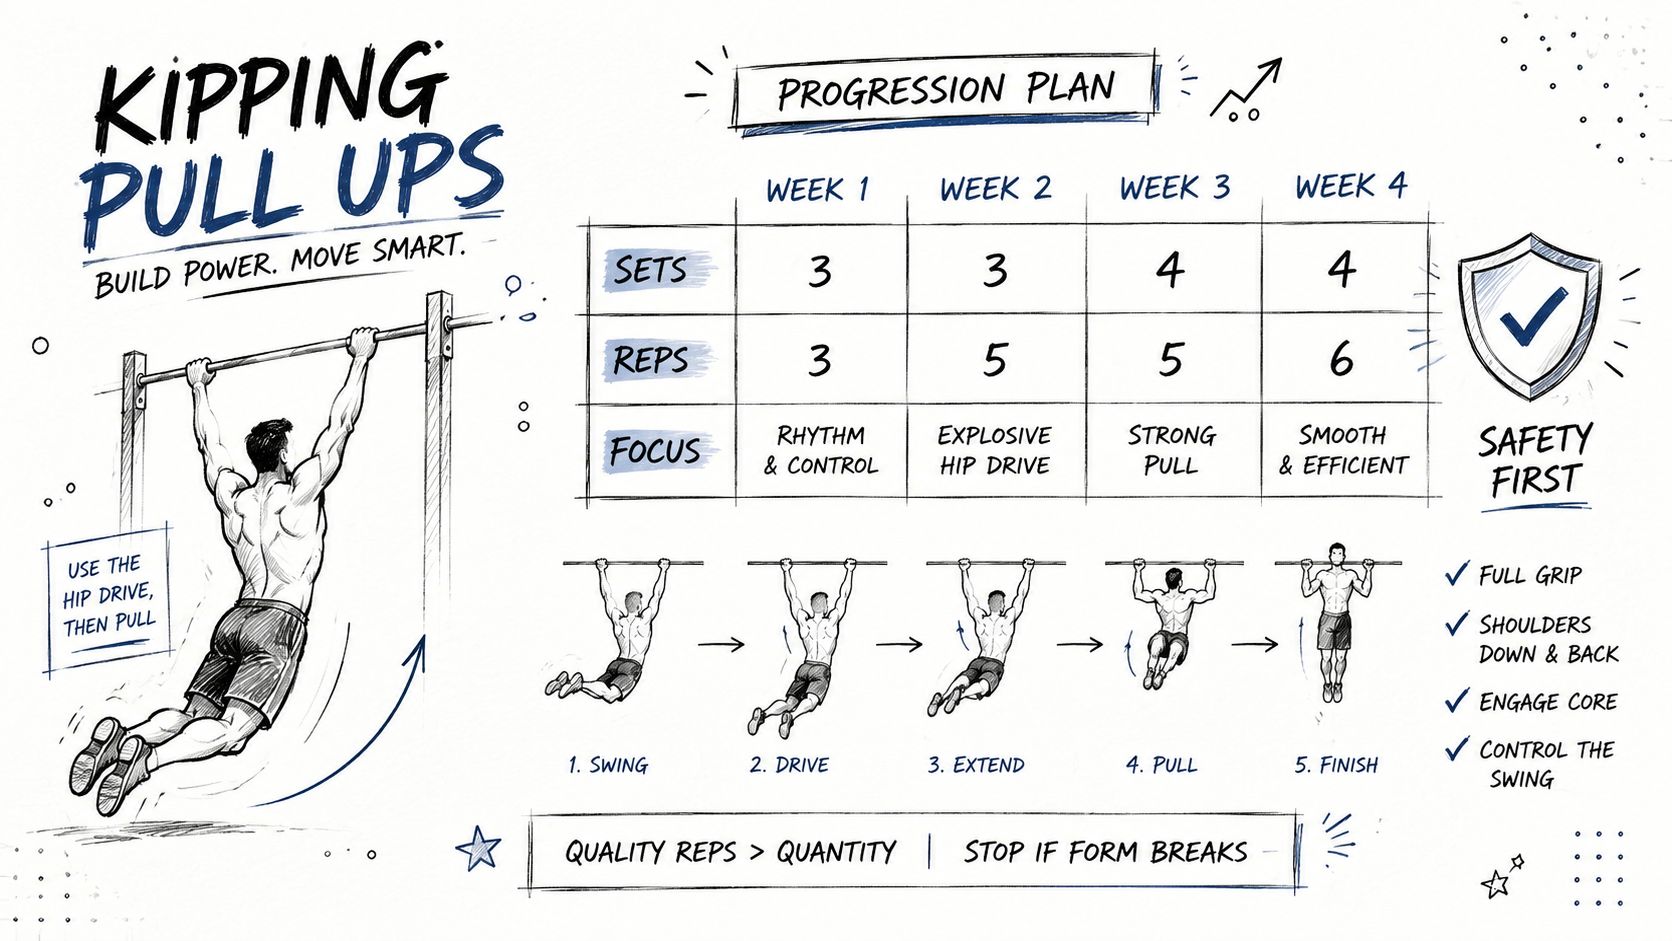
The movement is also meant to be repeated. CrossFit's guidance recommends linking repetitions in sets of 1-3 or 2-3 sets of 3-5 reps, which shows how the movement is usually programmed, as repeated efficiency work rather than a heavy single-effort test (CrossFit's technique guide). That programming choice matches the sport. It also explains why athletes can express far more volume in the kip than in strict pulling.
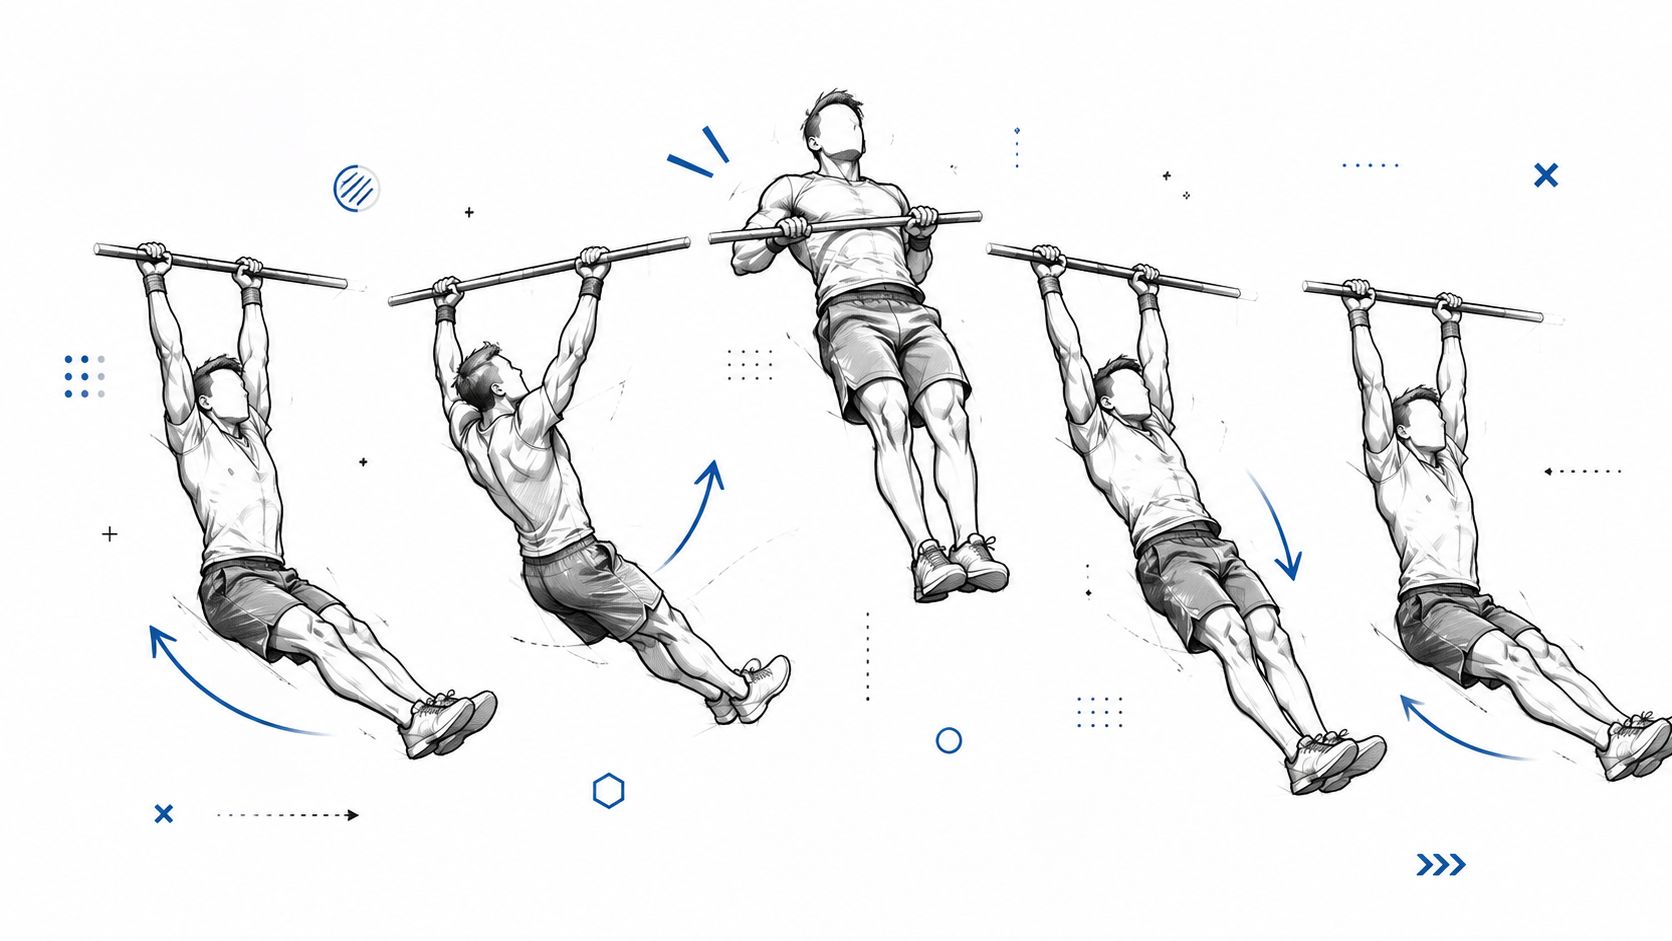
The clean takeaway is simple. A strict pull-up measures isolated pulling strength. A kipping pull up measures whether you can organize your body through a swinging, elastic cycle and keep that cycle repeatable under fatigue. Treating those as the same lift is why so many people chase the wrong cue and end up frustrated.
Joint Mechanics and Muscle Activation Data
The question is not whether kipping feels harder. It is what the joints and muscles are doing. In lab comparisons, kipping pull-ups changed the motion pattern in a measurable way, with more hip and knee movement than strict pulling and lower upper-body activation in the muscles tested (biomechanics comparison).
Why the numbers matter
The reduction in latissimus dorsi and biceps brachii activation fits the wider research picture. A summary of the research on CrossFit's technique guide reported lower average upper-body activation when comparing kipping pull-ups with traditional pull-ups, and the previously cited study found that both kipping and butterfly variations reduced upper-body muscle activation relative to strict pull-ups (CrossFit's technique guide summary of the research). The point is simple, the kip is mechanically distinct, not just a rushed strict rep.
That has a direct programming implication. If each rep uses less upper-body activation, you can usually perform more repetitions with the same bodyweight. That does not make it a better hypertrophy tool than strict pulling. It makes it better suited to work capacity, repeated output, and sport-specific conditioning.
Practical rule: if your main goal is muscle gain in the lats and biceps, strict pulling still does the heavier lifting. Kipping is the tool for capacity, not the centerpiece for maximal hypertrophy.
The joint data also cuts through gym folklore. Bigger hip and knee motion does not mean you are “cheating.” It means the body is using a coordinated swing to move load through a different mechanical pathway. Once you look at it that way, the trade-off is obvious, less local muscle work per rep, more repeatability and speed.

That is why the kip belongs in programs where repetition density and movement economy matter. It does not replace strict strength work, and it should not be used as if it were the same thing when the goal is tissue growth or general pulling strength.
Strength and Mobility Prerequisites
The cleanest way to protect the shoulders is to earn the movement before you volume-load it. A common benchmark for readiness is a base of 3 to 5 strict, dead-hang pull-ups with perfect form, because that shows you can manage bodyweight without relying on the kip to hide weak links. The idea isn't ego, it's tissue readiness and control.
What to rebuild before you chase volume
Shoulder irritation changes the order. A 2023 biomechanics paper found shoulder-joint angles in the kipping pull-up showed more prominent impingement risk factors than strict pulling, and rehab-oriented guidance emphasizes rebuilding thoracic and shoulder mobility plus scapulothoracic endurance before you bring kipping volume back (return-to-kipping biomechanics paper). That's the right lens if you've had a cranky front shoulder or a history of catching pain in overhead work.
A few drills earn their place because they solve specific problems:
- Hollow rock, it teaches anterior core tension so the trunk doesn't leak force during the swing.
- Kip swings, they build bar familiarity and let you rehearse arch-to-hollow timing without pulling too soon.
- Banded assistance, it keeps the pulling pattern honest while reducing the amount of bodyweight you have to manage.
- Jumping kips, they help with timing and turnover when the full rep still breaks down.
- Thoracic and shoulder mobility work, including targeted opening work like this door-frame stretch sequence, which can help restore overhead position if your rib cage and shoulders feel locked down.
If you're trying to lose fat while building a stronger back, it helps to keep the work simple and repeatable. A good complementary resource is strength training workouts for weight loss, because the same principle applies there, build strength with movements you can repeat and recover from.
The order matters. First, establish strict pulling strength and pain-free overhead positions. Then layer in positional drills. Only after that should you start linking reps under real fatigue. If you skip that sequence, the kip turns into a shoulder test you didn't train for.
Step-by-Step Kipping Technique
A clean kip is about timing, not force. The body should move through each shape with enough tension that the next phase starts before the previous one falls apart. When that rhythm holds, the rep feels organized, not frantic.
Arch, hollow, pull
The rep starts with the body set in an arch. From there, the torso shifts into a tight hollow position, then the pull begins only after that rebound is available. That sequence is the part most lifters rush, and once they rush it, the kip turns into a tug with no usable swing.
A good reference point is a solid strict pull-up pattern, because the bar path and shoulder control have to exist before the kip adds speed. Use this proper pull-up guide if the basic pulling pattern still feels unstable. The kip should build on control, not replace it.
The useful coaching cue is simple, keep the swing driven by the shoulders and core, not by a knee bend that turns the rep into a leg kick. WODprep's technique guide makes that point clearly, and the same idea appears in other instructional guides as well, the torso sets the timing, the legs follow the torso (WODprep technique guide, Hevy kipping pull-up guide). If the legs start doing the job of the trunk, the swing gets noisy and the shoulders lose clean timing.
The pull itself is fast, but the return matters just as much. Keep tension through the descent, then let the legs come back through once the elbows are nearly extended so the next swing can start from a controlled position (Catalyst Athletics on kipping mechanics). That is the difference between a repeatable cycle and a rep that falls apart after the first turnover.
The rep should feel like a controlled rebound, not a drop and rescue.
A simple mental loop helps. Shape, load, pull, return, repeat. If the return stays smooth, the next rep starts on time. If the return gets loose, the shoulders absorb more of the mess and the bar path drifts.
The best kips look almost boring once they are consistent. The body stays tight, the pull is sharp, and the descent never turns into a free fall.
Common Errors and Fixes
The easiest way to ruin a kip is to turn it into a knee bend and fling. The rep still moves, but the swing becomes noisy and disconnected, the hips close too early, the torso stops doing its job, and the legs start kicking without a clear rhythm.
The errors that break the rep
The key fault is letting the legs drive the movement instead of keeping the shoulders and core in charge. The WODprep guide warns against collapsing the hip angle by folding to 90 degrees, and the WikiHow guide makes the same point in plain language, the swing should come from the chest and shoulders, not from knee-driven leg motion. That is the position rule that keeps the kip organized.
A few faults show up again and again, and they usually have a clear fix:
- Bending the knees too early, which makes the swing choppy. Keep the legs long and let the torso set the rhythm.
- Pulling before the hollow is set, which leaves the rep weak and stalled. Wait for the body to rebound before you pull.
- Dropping passively from the top, which often leads to shoulder slap at the bottom. Control the return and keep tension through the descent.
- Losing the hollow position, which makes the swing loose and noisy. Re-brace the trunk before the next rep starts.
If the rep feels like a squat jump hanging from a bar, the problem is usually timing and torso tension, not raw strength. Fix the body shape first, then add speed once the position stays consistent.
Programming and Safety Guidelines
Kipping pull ups should be programmed as a skill under fatigue control, not as a test of how many rough reps an athlete can survive. CrossFit's own coaching guide places them in short, repeatable clusters, usually 1-3 reps or 2-3 sets of 3-5 reps. That starting point makes sense because once fatigue rises, the swing gets less organized and the shoulder has to absorb more of the mess.
What to do with the data
The volume side of the movement is real, but it changes the goal. Elite testing can demand repeated output that sits far above what most athletes should use in regular training, which shows that kipping pull ups scale well for work capacity when the objective is speed and repetition rather than maximal strength. That does not mean chasing high volume is a smart default. It means the movement belongs in a system that controls fatigue and keeps the rep shape honest.
Shoulder tolerance is the part many gym scripts skip. The previously cited study found shoulder angles in the kip showed more prominent impingement risk factors than strict pulling, which is why a return after irritation should rely on objective readiness markers instead of a single pain-free set. Pain-free strict reps, a clean overhead position, and no lingering irritation after training tell you more than a rep count that only looked good in the moment.
A conservative framework works best:
- Start with short sets, 3 sets of 3 to 5 reps is a sensible first exposure when the technique is stable.
- Rest enough to keep the pattern clean, because the movement stops being useful once every rep turns into survival mode.
- Build strict work in parallel, because the kip is not a substitute for underlying pulling strength.
- Back off after shoulder irritation, then rebuild mobility and scapular endurance before reintroducing volume.
- Treat pain as data, especially if the front of the shoulder catches, pinches, or aches after the session.
The athlete who progresses fastest is usually the one who can repeat clean output without paying for it later. That means watching the shoulder, watching the swing, and keeping the reps inside a range that still looks like skill work.
Tracking Progress with Strive Workout Log
The fastest way to improve a kipping pull up is to stop guessing about readiness. Log your strict pull-up baseline, your kipping sets, and any shoulder irritation after the session, then watch whether the trend improves or gets noisier over time. That's especially useful when you're returning after a cranky shoulder, because pain-free strict reps and clean range tell you more than a single good workout ever will.
If you like a cleaner structure, the workout log guide shows how a simple log can keep progression honest without turning training into paperwork. The value here is practical, not fancy. You want a place to record reps, rest times, and how the shoulder felt on the day you reintroduced kipping volume.
Use a few simple markers:
- Strict baseline reps, so you know whether your pulling foundation is improving.
- Kipping set quality, so you can see when the swing starts to break.
- Pain or irritation notes, so you catch patterns before they become setbacks.
- Rest intervals, because sloppy timing often comes from fatigue, not poor effort.
- Next-session target, so progression is intentional rather than random.
That closed loop is what keeps this movement useful. Train, log, review, adjust. The kip gets safer when your notes are specific enough to show you what your body is tolerating and what it isn't.
If you want a simple place to track strict baselines, kipping volume, rest times, and shoulder notes, Strive Workout Log gives you a straightforward way to do it without clutter or paywall friction. Use it to record what your shoulders tolerate, then let the trend line decide when to add more reps.
Leave a Reply