
You step off the scale after eight serious weeks of training and see the same number you saw at the start. The mirror looks unchanged too, so you start wondering whether the workouts, careful meals, and progressive overload are doing anything at all. A body measurement tracker gives you another lens. It records changes that body weight and casual mirror checks often hide, then connects those changes to the training decisions that created them.
Why the Scale Is Not Telling You the Whole Story
The scale gives you one summary number. It doesn't tell you whether that number includes more muscle, less fat, extra water, depleted glycogen, or short-term digestive contents. That makes it useful, but incomplete.
Consider a lifter who holds the same body weight while adding muscle and losing fat. The scale stays flat because two opposing changes can offset each other. Waist circumference may gradually decline while upper-arm, chest, thigh, or glute measurements increase. That pattern is far more informative for a hypertrophy-focused lifter than a stagnant scale reading.
A second lifter weighs in after a hard lower-body session. Training stress can produce temporary swelling and fluid shifts around the worked muscles, so a new muscle-building signal may be hidden by short-term noise. The measurement doesn't become meaningless, but its timing matters. A tape reading taken under consistent recovery conditions can help separate a lasting change from the temporary effect of a demanding session.
A third lifter sees body weight shift by two kilograms after a day with substantially different sodium intake. That reading reflects a short-term fluid change, not two kilograms of newly gained muscle or lost fat. Treating that single value as a verdict can lead to unnecessary changes in calories or training.

The missing regional detail
Daily weigh-ins can still help when you compare them as a trend, but circumference data adds location. Waist measurements can reveal fat-loss progress even when weight moves slowly. Arm and thigh measurements can show whether the body parts receiving productive training are changing.
The history of systematic body measurement supports this idea. Anthropometry developed from describing and classifying the human form, with large-scale records becoming especially useful for military organizations. The CDC's national anthropometric reference data shows how that tradition later became part of standardized population health surveillance.
If you're losing inches while the scale resists, this guide to losing inches without losing weight can help you interpret the pattern. The practical rule is simple: never let one scale reading overrule a consistent set of measurements, training records, and photos.
Practical rule: Use body weight for overall direction, and use circumference trends to learn where the change is happening.
What a Body Measurement Tracker Actually Does
A body measurement tracker is a structured record of body weight, circumferences, and progress photos collected under repeatable conditions. It turns scattered observations into a trend that you can compare with training blocks.
Scale-only tracking answers, “What did I weigh today?” A mirror check answers, “Do I look different?” A measurement tracker asks a more useful set of questions: Is my waist changing? Are the muscles I train growing? Did a new block with more weekly sets produce a different result? Are the measurements comparable because I used the same landmarks and timing?
Think of the tracker as a financial dashboard. A finance app doesn't show only your bank balance. It separates income, expenses, and net worth so you can understand why the balance changed. A training tracker does the same by placing waist, hip, thigh, chest, and arm measurements beside body weight, workout volume, effort ratings, rest periods, and sleep notes.

Build the log around decisions
Start with a small set of measurements that matches your goal. Record the date, body weight if you use it, the circumference value, the measurement side where relevant, and any factor that could distort interpretation, such as an unusually hard session or poor sleep.
Then connect the entry to the training context:
- Weekly sets: Record the approximate weekly work for each target muscle so you can compare a measurement slope with a training dose.
- Effort: Add RPE or RIR when available. A larger circumference won't tell you whether the training was productive unless you know how hard the work was.
- Recovery: Note sleep quality and unusual fatigue. These details explain why performance or measurements may temporarily stall.
- Photos: Take them under consistent lighting and posture. Photos add visual context, but they shouldn't replace tape measurements.
A clothing-focused tool can serve a different purpose from a lifting log. If you need garment sizing or body-shape data, you can find the right fit with Robosize. For hypertrophy decisions, though, the key feature is not a polished image. It's a consistent history that lets you compare one training block with another.
Which Measurements Matter for Hypertrophy and Strength
Not every circumference deserves equal attention. For a lifter focused on hypertrophy, prioritize sites that reflect large muscle groups exposed to mechanical tension, sufficient weekly volume, full range of motion, and progressive overload.
The most useful starting group is upper arm, thigh, chest, and glute or hip circumference. Upper-arm measurements can reflect changes in the biceps and triceps. Thigh measurements capture the combined development of the quadriceps and hamstrings. Chest and glute or hip readings provide broader regional signals, although each can also be affected by fat distribution and measurement technique.
Training choices still determine whether a change is plausible. A systematic review recommends 12 to 20 weekly sets per muscle group as an optimum standard recommendation for hypertrophy in young, trained men, as reported in the resistance-training volume review. That isn't a universal prescription, but it gives you a concrete range against which to assess a stalled body part.
Range of motion is another filter. A systematic review of full and partial range-of-motion training found greater strength gains with full range of motion and significantly greater lower-limb hypertrophy, with a lower-limb hypertrophy effect size of 0.88, 95% CI 0.19 to 1.57, p = 0.027. A separate technique review recommends using a range that fully stretches the muscle for hypertrophy-focused training, with an overall eccentric-plus-concentric repetition duration of 2 to 8 seconds.
Longer rests can also matter when they help you maintain load and performance. A 2024 systematic review and Bayesian meta-analysis found that hypertrophy can occur across a wide range of inter-set rest intervals, while longer rests produced a small advantage for muscle growth over shorter rests.
| Measurement | Primary Signal | Best For | Research Filter |
|---|---|---|---|
| Upper arm | Arm-muscle size trend | Biceps and triceps blocks | Track with adequate sets, full stretch, and progressive loading |
| Thigh | Lower-body muscle trend | Quadriceps and hamstrings | Compare with full-range leg training and reliable rest periods |
| Chest | Chest and surrounding tissue trend | Pressing and chest-focused blocks | Interpret alongside exercise performance and body-fat changes |
| Glute or hip | Glute development and regional size | Hip-extension and lower-body programs | Keep landmarks consistent because fat distribution also affects the reading |
| Waist | Abdominal fat and health-risk trend | Cutting and recomposition | Treat it mainly as a fat-loss signal, not a direct hypertrophy score |
| Neck and calf | Smaller regional trend | Specialized goals | Often stays relatively stable for intermediate lifters unless directly prioritized |
Waist deserves special attention for health, not because it measures muscle growth. The WHO identifies high-risk waist cutoffs above 88 cm for women and 102 cm for men, and its evidence summary reports that people above the high-risk threshold were 11% more likely to develop cancer even when they met physical-activity guidelines. You can review the broader context in this guide to measuring body composition.
Choose the measurement that matches the question. If the question is “Am I losing abdominal fat?”, measure the waist. If it's “Did my leg block build muscle?”, prioritize the thigh and performance data.
How to Measure Reliably at Home
A tape measure only produces useful information when you use the same protocol repeatedly. ISO 7250-1 and ISO 8559-1 define standardized anthropometric measurement sets for physical and digital databases, while the CDC anthropometry manual uses millimeter-level precision for most body measures. Those standards matter because a misplaced tape or different posture can create a larger change than the physique adaptation you're trying to detect. The ISO anthropometric standard provides the formal reference point.
Take measurements in the morning, after using the bathroom, before eating and training. Use a flexible tape, stand relaxed, and exhale normally without sucking in your abdomen. Keep the tape snug against the skin, but don't compress it. Record most circumferences to the nearest 0.1 cm, or 1 mm, when your tape and technique allow it.

Use fixed landmarks
Mark or carefully identify the same sites every time:
- Waist: Place the tape at the chosen waist landmark, commonly around the narrowest area or a defined anatomical point. Use the same site for every session.
- Hip or glute: Wrap around the fullest part of the glutes and hips, keeping the tape level.
- Thigh: Measure at the marked mid-thigh point. Keep the leg relaxed and use the same side.
- Chest: Use the same horizontal level across the chest, commonly around the nipple line, without expanding the rib cage.
- Arm: Measure the mid-bicep area with the arm relaxed, or use a clearly documented flexed protocol if that is your chosen method.
A fasted morning baseline is preferable to an afternoon reading after meals, fluids, and movement. After intense leg training, wait 72 hours before comparing thigh or waist values, since local fatigue and fluid shifts can make the reading harder to interpret.
Self-taping works well when you use a mirror, keep the tape horizontal, and repeat the reading rather than pulling harder. If possible, an assistant can position the tape while you maintain a relaxed posture. Either way, avoid changing sides, breathing pattern, tape tension, or body position.
The video below demonstrates the visual process. Watch the tape path and posture, then write your own landmark definitions on a reusable card.
Reuse a one-page measurement card
Keep the protocol short enough to follow every time:
- Date and conditions: Morning, after voiding, before food and training.
- Order: Waist, hip, thigh, chest, arm.
- Side: Same side for unilateral sites.
- Posture: Relaxed, normal exhalation, no abdominal bracing.
- Tape: Snug, level, no skin compression.
- Notes: Hard training, unusual sleep, illness, or anything else that could affect interpretation.
Reliability research supports home circumference tracking when the protocol is standardized. In one PubMed-indexed study, self-measured waist, hip, and neck circumferences showed high reliability, with self-measurement test-retest ICC values of at least 0.87. The same source also warns that reliable repeated measurements don't guarantee accurate absolute body-fat estimates, so use circumference data primarily for direction and progress monitoring.
Reading Your Charts Without Fooling Yourself
A chart becomes useful when you stop treating every point as a verdict. Sodium, hydration, glycogen, sleep, digestion, and recent training can all move a reading without representing a lasting change in muscle or fat.
A raw daily value is therefore a poor basis for changing a program. A rolling average gives the trend more influence than one unusual morning. For body weight, a 7-day rolling average can reduce the emotional impact of isolated readings. For circumferences, weekly or less frequent measurements already reduce much of the daily noise, provided you keep timing and landmarks stable.
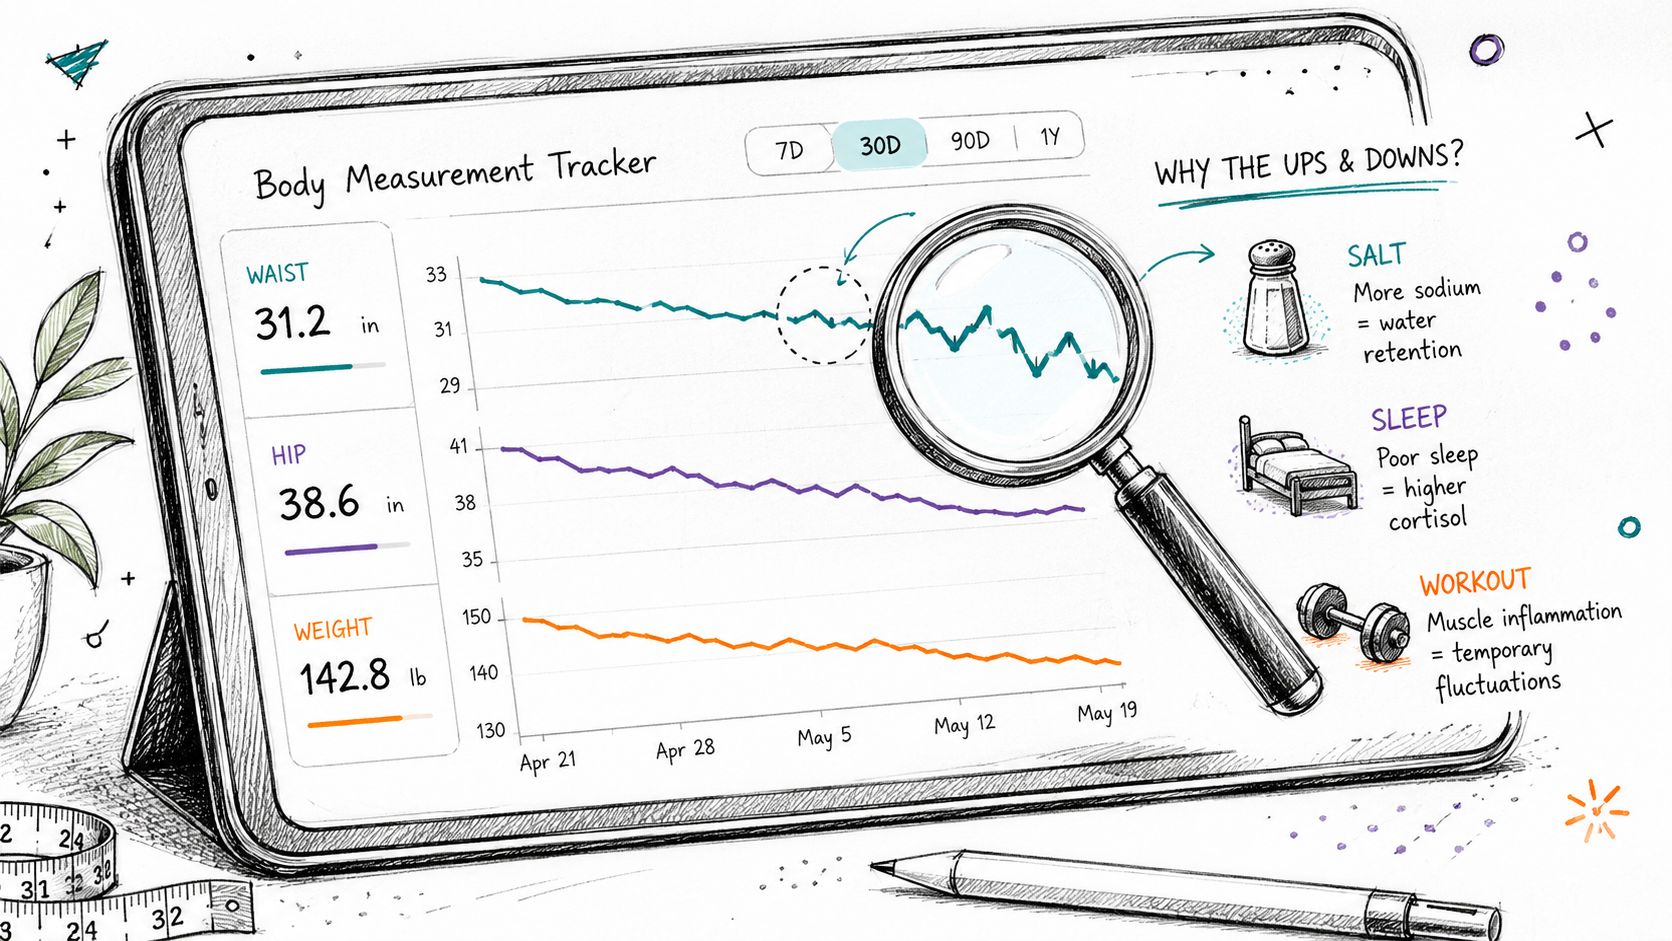
Match the chart to the training block
A waist line that declines while body weight changes slowly can support a fat-loss or recomposition interpretation. An arm or thigh line that remains flat during a block may mean the muscle hasn't grown, the measurement is too noisy, or the training stimulus isn't producing enough recoverable work.
Use the earlier hypertrophy filters to investigate rather than guess:
- Volume: If a target muscle receives less work than the research-supported 12 to 20 weekly sets range, a flat measurement may reflect insufficient stimulus. The volume recommendation comes from the systematic review of resistance-training volume.
- Range of motion: If the program uses partial repetitions that never load the muscle in a lengthened position, changing exercise selection or execution may matter more than adding random sets. The range-of-motion meta-analysis provides the relevant comparison.
- Rest: If short rests reduce load or repetitions across later sets, longer intervals may improve session quality. The rest-interval meta-analysis found a small growth advantage with longer rests.
Don't compare a fasted morning reading with an unfasted afternoon reading. Don't switch from the left thigh to the right thigh halfway through a block. Don't abandon a protocol after one flat measurement.
Change training when the trend stays flat across repeated, comparable check-ins and your performance data supports the same conclusion.
A later study found that manual circumference measurements and a body-composition app were highly repeatable, with reliability coefficients above 0.99, yet both methods underestimated DXA body-fat percentage by about 3.26 to 4.82 percentage points. The lesson is important: repeatability tells you whether a method gives similar results, not whether its derived body-fat estimate is absolutely correct. Treat body-fat outputs as model-based approximations, and trust consistent circumference direction more than a precise-looking composition score.
How Strive Puts Measurement Tracking to Work
A useful measurement system should sit beside the training records that explain it. Strive Workout Log includes a measurements area for body weight, body-fat entries, and circumference data, while workout logs hold exercises, sets, repetitions, loads, and effort information. That arrangement lets you review a body-part trend next to the work intended to change it.
Configure the measurements first
Create fields for waist, hip or glute, thigh, chest, and upper arm. Name each field clearly, record the side for unilateral sites, and use the same units and landmark descriptions every time. A weekly reminder can reduce the chance that you measure only when the mirror makes you anxious.
Log workouts as they happen. Record the weekly sets for each target muscle, the loads and repetitions, RPE or RIR when available, and the rest periods used. The point isn't to collect data for its own sake. It's to answer whether a stalled circumference coincided with stalled overload, insufficient volume, inconsistent effort, or a protocol problem.
Review the relationship, not just the line
Use charts to compare measurement changes with weekly set volume and exercise performance. If thigh circumference is flat while leg-session repetitions and loads are improving, you may need more time before changing the plan. If both the measurement and performance have stalled across comparable check-ins, review exercise range of motion, recoverable volume, rest intervals, and nutrition.
Tempo logging can also clarify whether a movement is being performed consistently. The review of resistance-training technique recommends a full stretch for hypertrophy-focused training and an overall repetition duration of 2 to 8 seconds, so a chart is more meaningful when the exercise execution remains stable.
Use rest-timer presets to make inter-set recovery repeatable. A longer rest period may help preserve load and repetition quality, but the measurement still requires time and consistent conditions before it can confirm a hypertrophy response.
Privacy deserves a place in the decision. The University of British Columbia privacy guidance explains that wellness and health apps may collect biometric, physiological, behavioral, and user-provided data, and that supposedly anonymized health information can sometimes be re-identified when combined with other information. Check whether your tracker supports local storage, export, deletion, and clear controls over reuse before building a long-term dataset.
Strive's progress dashboard can help you review measurements alongside training history and decide what to adjust in the next block. Use the review to replace mirror-based decisions with a documented comparison between stimulus, performance, and circumference trend.
A Simple Weekly Tracking Cadence You Can Start Now
A repeatable schedule beats an ambitious one you won't maintain. Use Monday morning for body weight, Wednesday morning for circumferences, daily entries for workouts, and every fourth Sunday for a broader review. This spacing keeps the measurements away from the immediate effects of a hard leg session while giving you enough training history to interpret the result.
A sample week
Monday morning: After using the bathroom and before food, record body weight. Add a short note if sleep, sodium intake, illness, or travel was unusual.
Tuesday training: Log exercises, sets, repetitions, load, effort, and rest periods immediately after the session. Keep the focus on the variables that can create hypertrophy, including progressive overload, sufficient volume, and a full usable range of motion.
Wednesday morning: Measure waist, hip or glute, thigh, chest, and arm under the same fasted conditions. Use the same side, order, landmarks, posture, and tape tension. The entry should take less than two minutes once your card and tape are ready.
Thursday through Saturday: Continue recording training. Don't add extra measurements because one body part feels or looks different. Daily visual impressions are useful context, not a replacement for the protocol.
Every fourth Sunday: Review the measurement trend beside weekly sets, performance, recovery notes, and body weight. Decide whether the block is working before changing exercises or volume.
Four mistakes cause most early tracking problems:
- Measuring after meals: Food and fluid can alter the torso reading, so use the same morning conditions.
- Swapping the tape side: A right-thigh reading and a left-thigh reading aren't interchangeable.
- Skipping rest-day baselines: Measuring immediately after intense training adds avoidable noise.
- Chasing daily fluctuations: A single point can't establish a muscle-growth trend.
Keep the loop simple. Train with exercises you can progressively overload, use a range of motion that meaningfully loads the target muscle, rest long enough to protect performance, and measure consistently. Circumference data won't diagnose your health or prove an exact body-fat percentage, but it can show whether your chosen training block is moving the regions you care about.
Strive Workout Log lets you record workouts, body weight, circumferences, sets, repetitions, loads, and progress charts in one local-first training log. Visit Strive Workout Log to build a repeatable measurement routine and connect your body changes with the training that produced them.
Leave a Reply